
A DHCP Server is a protocol server for TCP/IP networks that supplies IP addresses to other computers. DHCP Server for Windows also supports TFTP, DNS and HTTP protocol which makes a nice package for easy and simple to install networks e.g. for remote boot and other purposes. DHCP server runs on all Win32 capable Windows operating systems starting from Windows 95 to Windows 11.
The following describes how to run the DHCP Server for Windows. Since V2.9.3.1 there is also a Raspberry PI OS Version available. Please see instructions on how to install and run here.
Installation
The DHCP Server is a portable application and runs from anywhere on your computer. Extract the content of the zip file wherever you like, e.g. D:\dhcpsrv. You will now find the following files in there:
- dhcpsrv.exe
- dhcpwiz.exe
- readme.txt
- wwwroot
- dhcpstyle.xsl
- dhcppkgstyle.xsl
- favicon.ico
- index.html
- RJ45_5.jpg
- RJ45_52.jpg
Configuration with dhcpwiz.exe
If you are a first time user of DHCP server then the dhcpwiz.exe program gives you a good head start in setting up the ini file needed to run the DHCP server. The dhcpwiz.exe program is a wizard style configuration program for the DHCP server. It will guide you in 6 easy steps through the basic configuration of the software.
1. Welcome to the DHCP configuration wizard
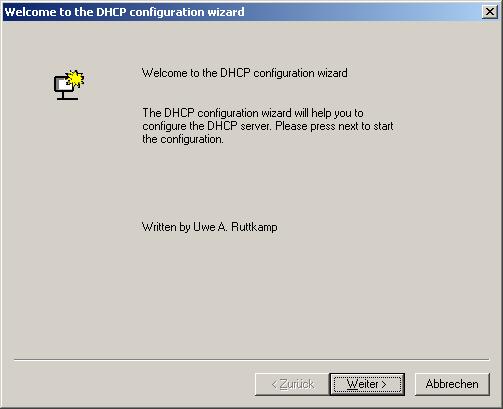 There is not much more to do than to hit the next button.
2. Network interface cards
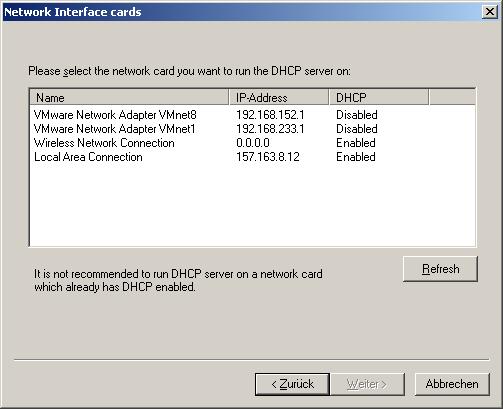 The DHCP configuration wizard lists all currently identified network interfaces on your computer. It is necessary to select one. This is going to be the interface that will be used by DHCP server. It is a good idea to choose a network interface with DHCP disabled that by itself is not getting it’s IP address from a DHCP server. This would probably cause conflicts. Hit next after interface has been selected.
3. Supported protocols
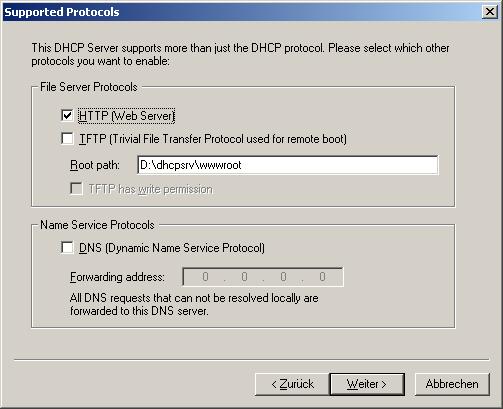 Now you can select which TCP/IP protocols should be activated. I’m suggesting to enable HTTP (Web Server) and hit next.
4. Configuring DHCP for interface
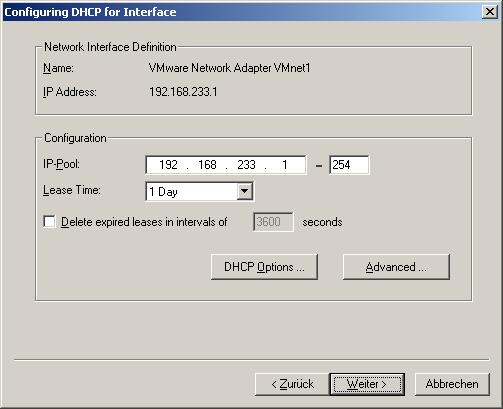 In this step you define the pool of IP addresses. A client will get an IP addresses assigned out of this pool. With the Advanced button, you get access to a dialog that allows you to define the subnet mask, the gateways and the DNS and WINS servers. DHCP wizard automatically takes the appropriate defaults based on the selected network interface card. The DHCP Options button opens a dialog that gives access to further DHCP options such as next (TFTP) server, bootfile, domain name and others including customized options. The default values should be good and lead you to the next step after hitting the next button.
5. Writing the INI file
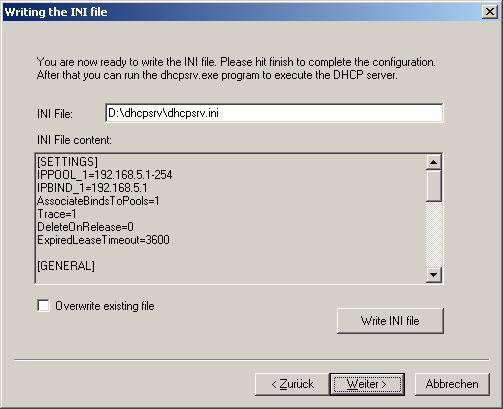 The final result of the DHCP configuration wizard is an INI file. This file will contain all the configuration options. The filename and path shown here should point to d:\dhcpsrv\dhcpsrv.ini, depending on where you’ve exctracted the zip file. It is important that the INI file is placed into the same folder as dhcpsrv.exe resides. If that is all ok, then hit the “Write INI file” button and then the next button to enter the final step of the configuration. Please note that DHCP wizard is not intended to reedit the INI file once it is written. Its purpose is the first time configuration. But of course nothing prevents you from using the wizard again. Just please make sure that you don’t overwrite your INI file unintended. That is the reason why the “Overwrite existing file” is by default unchecked.
6. DHCP configuration completed
 The windows firewall is a great thing to have. But it can be a pain also to get communication server programs working. That is the reason why the wizard gives you at this stage the option to add the dhcp server program to the exception list of the windows firewall. Please hit the configure button and wait for the status to change from “Not configured” to “configured”. If you are not running the DHCP configuration wizard with administrator privileges, then you need to do that after you have elevated your rights accordingly by hitting the “Admin…” button.
It is now time to start the DHCP server program. The DHCP server can run as a service or as an application. If you want to run it as a service then you can install and start the service here also. Again, non-administrators can do that only after elevation (the “Admin…” button). The status needs to change from “Not installed” to “Running”. If you decide not to install DHCP server as a service but wants to run DHCP server as an application, then you can tick the “Run DHCP server immediately” check box and click finish.
Running dhcpsrv.exe
Once the INI file has been created by the DHCP configuration wizard, it is now time to start the actual DHCP server program. If you have done that already as part of the DHCP configuration wizard step 6, then you are done and don’t need to read the rest.
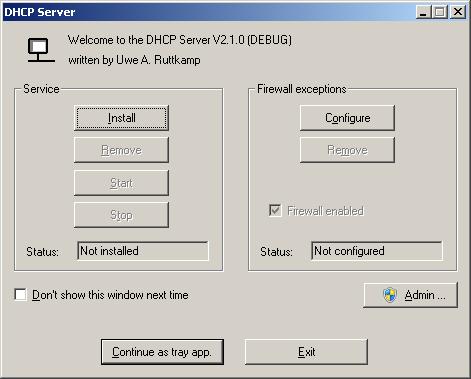
If you have not already done so, start the dhcpsrv.exe. If you are running Windows NT or Windows 2000/XP/VISTA/7/8/10/11 then the DHCP server will show you the following dialog box:
 On all older operating systems (Windows 98, etc..) the DHCP server will go straight into the tray as a tray icon application.
If you are running the windows firewall, then DHCP server can enter itself into the exception list. Please hit the configure button and wait for the status to change from “Not configured” to “configured”. If you are not running the DHCP server with administrator privileges, then you need to do that after you have elevated your rights accordingly by hitting the “Admin…” button.
It is now time to really start the DHCP server program. The DHCP server can run as a service or as an application. If you want to run it as a service then you can install and start the service here. Again, non-administrators can do that only after elevation (the “Admin…” button). The status needs to change from “Not installed” to “Running”. If you decide not to install DHCP server as a service, then you hit the “Continue as a tray app” button. If you tick the “Don’t show this window next time”, then DHCP server will not bother you again with this dialog and goes straight into the tray. If you forgot to configure the firewall or you didn’t trust DHCP server to handle your firewall configuration correctly, then Windows will ask you for permission to let DHCP server communicate through the firewall. Say yes to everything that might come up and you will see a little tray icon showing that DHCP server is running.
Once the DHCP configuration has been performed and DHCP server is started, you probably want to know whether it actually works. If you have activated the HTTP support as part of step 3 during the DHCP configuration wizard, then you can use your internet browser to open the DHCP status web site: http://127.0.0.1/dhcpstatus.xml. Also easily accessible through the tray icon, right mouse, Open status. This should show the configured and operating connections and also all currently active clients. I assume there aren’t any yet. Once a DHCP client is assigned an IP address it will show up after reloading the page.
Since V1.7 command line options are supported to better integrate the DHCP server into setups or to quickly install and remove the service. The command line options are:
| -install | installs the DHCP Server as a service |
| -remove | removes the service |
| -start | starts the service |
| -stop | stops the service |
| -control | opens the above dialog box to control the service |
| -help | shows a help message dialog box |
| -runapp | runs the DHCP Server in application mode (regardless of service installs) |
| -ini filename | sets the pathname of the ini file to be used by the DHCP Server (default is dhcpsrv.ini). This works only in application mode |
| -configfirewall | Configures firewall exceptions for dhcpsrv.exe |
| -removefirewall | Removes firewall exceptions for dhcpsrv.exe |
Command line options are interpreted from left to right and can be given in any order. Example
dhcpsrv -install -start installs and starts the DHCP server service with one command
Please be aware that you need to have administrator privileges to install the DHCP Server as a service.